Thursday, December 12, 2019

Send Emails without a server-side code with Angular


Without any server-side code hosted on a server, you can send emails through your Angular application with smtpJS, a client-side Javascript library.

First you need to download this library and include it into the necessary component of the Angular Application.
Click here to download the library file.

Next , put this downloaded js file into the assets folder found in src directory of the project.

Next we have to get the help of an email service provider to send the email. I here use Elastic Email site for this. First go to the Elastic Email site to create an account.  Just complete the sign up process, it's that simple.
After logging into the site, go to Start ---->  Connect To SMTP API . 


Next, you can see a button to create new credentials. Create a new credentials following the simple steps. The system will generate a password for you. Copy that password and save it somewhere before you close that popup model.

Finally you'll see something like this.


Here, your user name and password (You saved it earlier) can be seen .These details are used to access this.

Coding part

Go to your angular project's relevant component from which an email must be sent.

1. Import the smtp.js file from assets folder to the component by  typing
    import './../../../assets/smtp.js'; <!-- path might change according to your file structure-->
declare let Email : any;

2. Write the code to send the email with the user-inputs within onSubmit() method as below,
Here , within Email.send(....);  method, you can give the elastic mail registered email as the username , and earlier saved password for the password field.  From: email should be equal to the elastic mail's registered email and you can set the receiver's email under To field.
Other fields can be taken from your form created .

That's it.

Sunday, November 3, 2019

Simply Deploy your Angular App on Netlify


This article is all about how you can deploy your Angular application securely on Netlify server . This is a free place for you to deploy your application.

First you need to have a Netlify Accout (Create if not)  and a GitHub repo of your project.
( I assume that you already have a github repo of your Angular project.)
I teach you the way with a sample project I created just for fun.

Let's begin

1. First go to your Netlify account. There you can see a button     "New site from Git"(Fig 1.1). Click on it.
Fig 1.1

2. Then select the repository site. I here select GitHub.(You can select the site where your project is.)
When selected, you are redirected to authorize the access from netlify and there you can select the repository that you need to deploy.

 3. Select the repository again and go to step 3. (Fig 1.2)
Fig 1.2


Here in this page, you have to fill some information. (you can change these later too)
     You can specify which branch needs to be deployed.
     For Build Command , give ng build --prod
     For Publish directory , give dist/<your project name>
                     (You can find your correct project name at the end of angular.json file of your project. Ex: dist/my-blogger-web  as in Fig(1.3))
Fig 1.3

If all set. Click the button "Deploy site". You will be directed to something like this in Fig 1.4.
Fig 1.4


4. Next, go to Settings tab and copy the API ID  and save it somewhere because we are gonna need it later. (Fig 1.5)
[Here, you can change your site name also.]
Fig 1.5


5. We need to find a Personal Access Token key . 
              Click on Avatar picture of your profile on right top corner,                 select User settings,
               Select Applications from the menu,
               Under Personal access tokens, click New access token button .
(Fig 1.6, Fig 1.7)
Fig 1.6

Fig 1.7


     Give a simple description for the token so that you can identify why this token is used, when you check tokens sometimes later. 
    Click the button to Generate a token. Copy and paste that token somewhere to use it later. Then click Done! at last.

***Here after , you have some configuration inside your angular project.***

6.  Open the command window inside your Angular project's root folder.

  and run this command ng add @netlify-builder/deploy
  *There you are asked to enter API ID: you can enter it from where you copied and saved it earlier.
  ** You are asked  next to enter personal Acccess token which you generated earlier . Please, do not enter it here.Just press enter and skip it.( Because these details are entered in your angular.json file which can be tracked in your github repo easily so that outsider can use your API ID and access token to get access to your site. see Fig 1.8 )


Fig 1.8


7. Next you have to set up the access token key as an environment variable of your computer.
    Right click on This PC icon on desktop of you computer ==>     Properties ==> Advanced system settings ==> Advanced tab ==>Environment Variables ==> User Variables

  Under User variables , you have to enter a new variable, Variable Name as NETLIFY_TOKEN and  Variable value as the access token key generated earlier and saved for later use by you. see Fig 1.9
Fig 1.9


9. Next you have to run 
               ng run <your project name>:deploy
     Plz, give your project name when running the above command. Ex: ng run my-blogger-web:deploy

[For Angular vCLI 8.3.0 and above, just run ng deploy  ]

  This creates a folder dist/<Your project name>  which you gave as the Publish directory for netlify site.

10. Next part is, open your .gitignore file of your project and delete the line with /dist to track dist folder to be pushed to gitHub.

 At last commit and push.

Here you go, go to your netlify site, and Click Trigger Deploy  button to deploy. You can change 'deploy settings' there if you want.


All done!

Your site is available at https://<your site name>.netlify.com

                             ex: https://udithdemo.netlify.com


Thank you.


Monday, October 21, 2019

All about .replaceAll() in Java


  java.lang.String class  brings you a very powerful method  to do replacements within a string.
   This method allows you to target  specific substrings using regular expression ,so that you can even remove and replace any pattern within a string.
 
Mainly, this method can

  •    replace a given substring found any where in the string
  •    replace a given character found any where in the string
  •    replace a given reg expression found any where in the string    
    Even though there are separate methods like replace(char old, char new), replace(charSequence old, charSequence new) to do above functions, this replaceAll() method acts as a versatile method for all those functions.   

This is how this method is defined in String class,
 
            String replaceAll(String regex , String new)  

   As you can see , this method returns a new string.  Actually, a string is immutable in JAVA , so it is not possible to alter a string. This method returns a new string instead.You need to catch it with a string variable.

      *This method accepts to two parameters which must be in type String. So , when you need to replace a character, you have to use a double quotation for the characters (instead of single quotations which are used for representing char). 

Examples: 

    
Character replacement

String replacement
Regex replacement


Keep in Touch!!!

Tuesday, September 24, 2019

Fixing 401 Error with CORS Preflights (with Spring boot)


When the web application runs on a different domain and the server runs on another domain,  we have to deal with cross origin requests. But, if we don't know the mechanism of cross origin resource sharing (CORS), we will end up with errors like 401.

Error in brief

    My Angular web application runs on port 4200, and my spring boot application runs on server on port 8080. I could not enable CORS in my backend, so, I got an error when sending a request from my application like this.


Reason

       My pre-flight request is not responded with status OK(200).

Solution

        I enabled CORS in my backend. To do this, there are several methods. Here in my post, I have shown the easiest way to do that. But, if you are interest in knowing other ways, click me )

By using Web Security in Spring Boot,

      You have to create a web security configuration class.  I hope everybody creates that class for backend authentication purposes. 

If you have already created that class, inside configure(HttpSecurity httpSecurity) method ,add this line httpSecurity.cors();


It's that simple !!!


Pre-flight Request:

  It's an OPTIONS- request  sent to determine whether the target of the request (Server) supports the request.

Sending pre-flight requests is the first step in CORS(Cross Origin Resourse Sharing) mechanism.

Before sending the actual request, the application sends a pre-flight request to the server.
The server can then respond to the pre-flight request with a collection of headers:


  • Access-Control-Allow-Origin:    Defines which origins may have access to the resource. A '*' represents any origin.


  • Access-Control-Allow-Methods:     Indicates the allowed HTTP methods for cross-origin requests


  • Access-Control-Allow-Headers:     Indicates the allowed request headers for cross-origin requests


  • Access-Control-Max-Age:     Defines the expiration time of the result of the cached preflight request


    So, if the pre-flight request doesn't meet the conditions determined from these response headers, the actual follow-up request will throw errors related to the cross-origin request ( Most probably error 401).

Friday, September 20, 2019

How to use ng-bootstrapped Popup Modals within Angular Components


        Hello guys, this article is about how to add ng-bootstrapped modals within your components in Angular application. Going through this article, a very beginner can learn how to add and use different bootstrapped gadgets and other stuffs  with your Angular application.
       I have already created a very simple project but not yet bootstrapped. I just need to add a popup message box when clicking on the button on the page. 
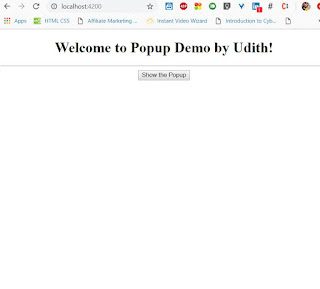
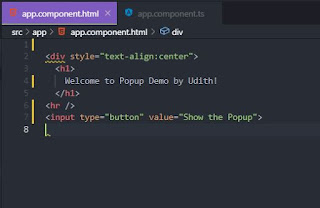
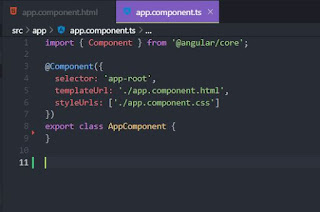
Below is how my application looks right now and I have used only app.component.ts and app.component.html files for this.

Initial Web Page
app.component.html
app.component.ts
     Now let's begin to add the requirements to continue.

Step 1

  • Go to the root project folder of your project.
  • Install ng-bootstrap to your project by running 
  •                                     npm install --save @ng-bootstrap/ng-bootstrap
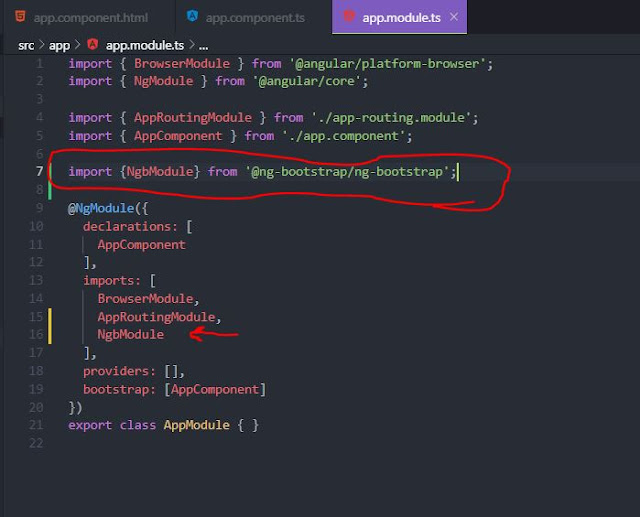
  • Go to app.module.ts file and import the Ngbmodule inside import array. 
                        import {NgbModule} from '@ng-bootstrap/ng-bootstrap';           
app.module.ts


  • Go to index.html and copy the bootstrap CDN code snippent from bootstrap site , within the scope of <head></head> tags.
  •                             ( For now,    <link rel="stylesheet" href="https://stackpath.bootstrapcdn.com/bootstrap/4.3.1/css/bootstrap.min.css" integrity="sha384-ggOyR0iXCbMQv3Xipma34MD+dH/1fQ784/j6cY/iJTQUOhcWr7x9JvoRxT2MZw1T" crossorigin="anonymous"> )

Step 2

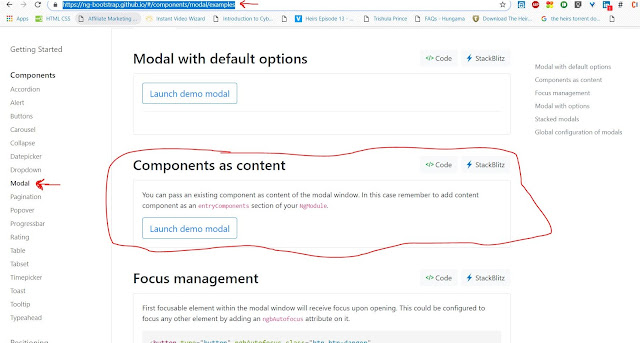
  • Go to ng-bootstrap site and find the bootstrap code section for Modal.(Modal-ng-bootstrap
   
Section for Modals
     
  • Within the section I have circled in , when you click the button with name "</>Code", you can find a code file with the name modal-component.ts with the following code snippet.


  • Here , in the above code, you can find two classes as NgbdModalContent (squared in red colour) and NgbdModalComponent (squared in purple colour). 
  • Now it's time to copy code from this snippet and paste it into your app.component.ts file. 
  • First, import the modules shown in Section 1 in the above image into your app.component.ts file.
  • Secondly, Copy the whole code in section two and paste it at the very end of   the app.component.ts file.
  • Thirdly, inject the service into the constructor of your AppComponent class in app.component.ts file ,as shown in section 3 .
  • And, Lastly, Copy the method "copy()" shown in the section 4 as a netive method of  the AppComponent class.
  • This method can be used in an (click) event within the button in html file now.


Step 3


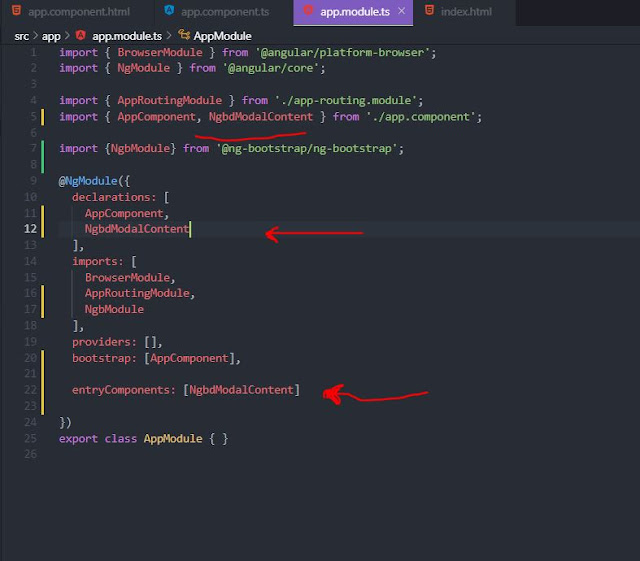
  • Enter NgbdModalContent class  in declarations array as well as an entryComponent in app.module.ts file.       

        
app.module.ts

Finally

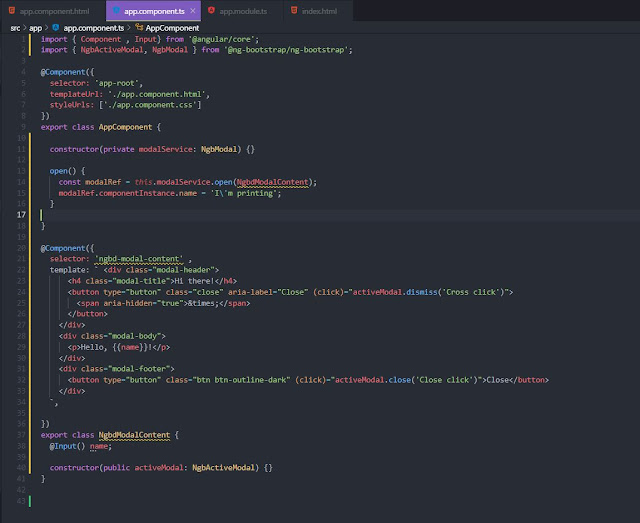
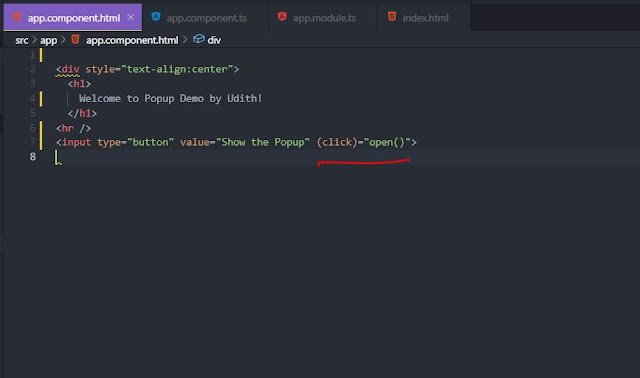
      This is my app.component.ts file and html file .
app.component.ts

app.component.html

Final View when clicked on the button on the page,


Enjoy bootstrap!!!


Friday, August 30, 2019

Monorepo :

A syllabic abbreviation for "Monolithic Repository".

        A monorepo is a software development strategy where code for many projects are stored in the same repository.

Definitions vary, but we define a monorepo as follows:

  • The repositorycontains more than one logical project. (e.g. an iOS client and a web application)
  • These projects are most likely unrelated , loosely conected or can be connected by other means (e.g. via dependency management tools)

 The repository is large in many ways:
           Number of commits
                  Number of branches and/or tags
                  Number of files tracked
                  Size of content tracked (as measured by looking at the .git directory of the repository) 


Google, Facebook ,Twitter, Uber, Microsoft and many well recognized companies use big monorepos.


Pros

  • Ease of Code reuse
  • Simplified dependency management
  • Atomic level commits
  • Large Scale code refactoring
  • Collaboration across teams

Cons

   •                  Loss of version information

   •                  Lack of per-project security

   •                  More storage needed


References:


    https://www.atlassian.com/git/tutorials/monorepos


Send Emails without a server-side code with Angular

Without any server-side code hosted on a server, you can send emails through your Angular application with smtpJS, a client-side Javasc...